DIY Headlight Restoration: How to Restore Your Car’s Headlights at Home Like a Pro
January 12, 2023

If you’re tired of dealing with dirty, foggy, or discolored headlights, you may be wondering how to restore them yourself. If you have the patience and time, you can restore your headlights at home like a pro with just a few simple tools and supplies. Here’s how:
Gather your materials
You’ll need a headlight restoration kit, which should include sandpaper of various grits, a buffing pad, and a polishing compound. You’ll also need a bucket of water, a towel, and a toothbrush or other small brush.
DIY and Professionals: Build Your Own Headlight Restoration Kit
You can also build a restoration kit with your own supplies if you have them at your home. You’ll need sandpaper of various grits including 600, 800, 1000, 1500 and 2000 grit. You’ll need a microfiber polishing pad and polishing compound to make a complete kit like the ones made in store. To seal the work off you’ll need a clear coat spray, clear coat wipes or ceramic coating made for plastics and trim.
Clean the headlights
Start by thoroughly cleaning the headlights with soap and water to remove any dirt, grime, or debris. Use the toothbrush to scrub away any stubborn dirt or contaminants. Dry the headlights with the towel.
Pro tip: You can also keep the surface lubricated with all purpose cleaner, a waterless wash solution or clay lube.
Sand the headlights
Using the sandpaper included in your headlight restoration kit, start sanding the headlights in a circular motion. Begin with the coarsest grit and work your way up to the finest grit. This will help to remove any surface imperfections and prepare the surface for polishing.
If your headlights are severely oxidized, start at 600 grit sandpaper. Moderately oxidized headlights can be sanded starting with 800 grit. Work your way up from 600 or 800 grit to finer grits in order making sure to keep the surface wet with soap and water for better sanding.
Make sure to work in a circular motion, reaching all parts of the headlight casing. Remember, the larger the number, the finer the grit.
Buff the headlights
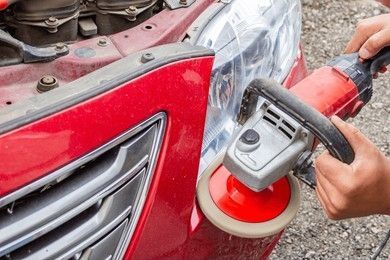
Once you’ve finished sanding, use the buffing pad and polishing compound to buff the headlights in a circular motion. This will help to restore the shine and clarity of the headlights.
Clean and protect the headlights
Once you’ve finished buffing, clean the headlights one more time with soap and water. Allow them to properly dry. Then, apply a protective wax or sealant to help protect the headlights from future dirt and grime.
To properly seal headlights from becoming oxidized again, use a ceramic coating or clear coat on the plastic of the headlights so that they can maintain their shine and look new for longer.
By following these steps, you can restore your car’s headlights at home like a pro, making it easier to see in the dark again. Just be sure to follow the instructions included with your headlight restoration kit and use caution when sanding and buffing to avoid damaging the headlights.
Professional Headlight Restoration
If you don’t have the time or inclination to tackle this task yourself, you can always turn to a professional headlight restoration service like Westchester Auto Detail.
Our team of experienced professionals uses only the best techniques and products to restore the clarity and shine of your headlights, helping you see better and be seen more easily on the road. We offer convenient scheduling and can come to you, whether at your home or office, to make headlight restoration as convenient as possible.
If you’re interested in restoring the clarity and shine of your headlights, contact Westchester Auto Detail to learn more about our headlight restoration service and schedule an appointment. We’ll take care of everything, leaving you with bright, clear headlights that help ensure your safety on the road.
